 GoSuda
在 gVisor 内部及嵌套沙箱中使用 gvx 运行 Docker-in-Docker

快速解决方案:在无特权的 gVisor(runsc)沙箱中安全运行 docker:dind
云端 AI 智能体计算环境(例如 Google Agent Compute Engine 沙箱)、Kubernetes agent-sandbox 部署(RuntimeClass: gvisor)以及强化学习评估框架,会将不可信的工作负载隔离在 gVisor(runsc) 容器中,专门用于保护宿主机内核。当默认无特权的 runsc 容器内的工作负载尝试通过 apt-get 安装 docker.io 或 docker-ce、执行 service docker start 或 dockerd,并运行 docker build 时,即使其在容器内拥有 root(UID 0)权限,操作仍会失败。
借助 gvx(rungv),你可以在无特权的 gVisor(runsc)容器内 安全地 直接运行 docker:dind、docker build 和 docker compose(或将 gvx 嵌套在 gvx 内),且无需削弱外层 RuntimeClass、暴露宿主机套接字或授予 --privileged。
面向 AI 智能体的低成本、高 token 效率解决方案:在 gVisor 支持的云端智能体环境中,尝试安装
docker.io并手动绕过/etc/init.d/docker的ulimit错误、iptables-nft失败、iptables-legacy原始套接字拒绝、overlay2挂载错误以及docker build的runc/pivot_root崩溃,通常会在彻底失败前耗费 20 次以上的工具调用轮次和数万 token。gvx(rungv)是一种 低成本、高 token 效率的即插即用解决方案:智能体只需在一轮中执行 3 条命令,即可启动一个可用的用户态 Docker 守护进程,并随即执行docker build和docker compose,而无需修改项目文件。
保持并强化外层沙箱隔离:在
runsc内运行rungv不会绕过外层gVisor沙箱实施的任何限制。相反,gvx会创建第二层嵌套的用户态 gVisorSentry内核,该内核具有自己的hostlockdown(PR_SET_NO_NEW_PRIVS+seccomp)、自己的内存内netstack,以及单文件ext4lite卷。内层dockerd和runc容器受到双重沙箱保护:其系统调用、挂载操作和原始数据包均不会离开内层gvx用户态内核。
 1# 在现有的 gVisor(runsc)容器或 Kubernetes Pod 内:
 2# 从经 SLSA 证明的 GitHub 发布归档中安装 rungv,或通过 go install 安装:
 3CGO_ENABLED=0 go install z.gfire.dev/gvx/cmd/rungv@latest
 4
 5mkdir -p ~/.gvx
 6rungv run \
 7  -p unix:~/.gvx/docker.sock:2375 \
 8  -v gvx-docker:/var/lib/docker \
 9  -e DOCKER_TLS_CERTDIR= \
10  docker:dind --tls=false &
11
12# 通过内层 gvx 套接字运行标准 Docker 构建和容器
13export DOCKER_HOST="unix://$HOME/.gvx/docker.sock"
14until docker info >/dev/null 2>&1; do sleep 0.5; done
15docker info --format '{{.Driver}} {{.OperatingSystem}}'
16# 输出:overlayfs Alpine Linux ... (containerized)
17
18docker build -t nested-app:test .
19docker run --rm nested-app:test
在 gVisor(runsc)内直接安装 Docker 失败的五个原因
当用户或 AI 编码智能体在标准 runsc 容器内运行 apt-get install -y docker.io(或 docker-ce)并尝试启动 dockerd 时,会遇到五个相继出现的技术障碍。
1. Init 脚本(systemctl / service docker start 的 ulimit)与内核模块(modprobe 4.4.0)失败
运行 apt-get install -y docker.io(或 docker-ce)之后,通过 systemctl start docker 或 service docker start 尝试启动守护进程会立即失败,因为 PID 1 不是 systemd,并且 /etc/init.d/docker 试图将 ulimit -n 提高到沙箱的硬 RLIMIT_NOFILE 上限之上。随后直接调用 dockerd 时,初始化脚本会针对 gVisor 的虚拟内核版本(4.4.0)调用 modprobe 以加载 overlay、bridge、br_netfilter、ip_tables 和 nf_nat,而该版本并不存在 /lib/modules/4.4.0 目录:
1System has not been booted with systemd as init system (PID 1). Can't operate.
2Failed to connect to bus: Host is down
3/etc/init.d/docker: 62: ulimit: error setting limit (Operation not permitted)
4level=warning msg="Running modprobe bridge br_netfilter failed with message: modprobe: WARNING: Module bridge not found in directory /lib/modules/4.4.0\nmodprobe: WARNING: Module br_netfilter not found in directory /lib/modules/4.4.0\n, error: exit status 1"
5modprobe: FATAL: Module overlay not found in directory /lib/modules/4.4.0
6modprobe: FATAL: Module br_netfilter not found in directory /lib/modules/4.4.0
7modprobe: FATAL: Module ip_tables not found in directory /lib/modules/4.4.0
8modprobe: FATAL: Module nf_nat not found in directory /lib/modules/4.4.0
2. iptables-nft(nf_tables Netlink)、iptables-legacy 原始套接字拒绝以及 docker0 网桥失败
在 Ubuntu 22.04、Ubuntu 24.04 以及 Debian 11/12 上,apt-get install docker.io 会将 iptables-nft(由 nf_tables netlink 子系统支撑)选为默认的 /usr/sbin/iptables 替代项。此外,即使用户或智能体切换到 iptables-legacy(update-alternatives --set iptables /usr/sbin/iptables-legacy),默认的无特权 gVisor 沙箱(--net-raw=false)也会以 EPERM 拒绝 AF_INET, SOCK_RAW 套接字,导致 iptables-legacy 即使以 UID 0 运行也会因 Permission denied (you must be root) 而失败:
1failed to start daemon: Error initializing network controller: error obtaining controller instance: failed to register "bridge" driver: failed to create NAT chain DOCKER: iptables failed: iptables --wait -t nat -N DOCKER: iptables v1.8.10 (nf_tables): Could not fetch rule set generation id: Invalid argument
2iptables v1.8.10 (legacy): can't initialize iptables table `nat': Permission denied (you must be root)
3Perhaps iptables or your kernel needs to be upgraded.
4iptables v1.8.10 (legacy): can't initialize iptables table 'nat': Table does not exist (do you need to insmod?)
5iptables: No chain/target/match by that name.
6Unable to enable SKIP DNAT rule: (iptables failed: iptables --wait -t nat -I DOCKER -i docker0 -j RETURN: iptables: No chain/target/match by that name.)
7Error initializing network controller: error obtaining controller instance: failed to create bridge "docker0": operation not permitted
3. gofer / 9p 根文件系统上的 overlay2 失败与 vfs 磁盘耗尽
除非外层 runsc 管理员明确为 /var/lib/docker 预先配置了专用的 tmpfs 或 filestore 挂载,否则容器根文件系统由 gVisor 的 gofer(9p/lisafs)或嵌套的 overlay 挂载支撑。在 /var/lib/docker 之上挂载 overlay2 会失败:
1level=error msg="[graphdriver] prior storage driver overlay2 failed: driver not supported"
2failed to mount overlay: invalid argument
3Error starting daemon: error initializing graphdriver: driver not supported: overlay2
当用户或智能体试图通过启动 dockerd --storage-driver=vfs 绕过此错误时,Docker 会完全禁用写时复制(Copy-on-Write)层共享。Dockerfile 中的每条 RUN 指令都会对整个根文件系统执行完整的递归复制(dirCopy),将一个 500 MB 的镜像在 10 个构建步骤中放大为 5 GB 的写入量,最终导致沙箱因 no space left on device 或 I/O 超时而终止。
4. docker build(BuildKit)与嵌套 runc 失败(pivot_root、/proc、Cgroups 和 DNS)
即使 dockerd 被强制以 dockerd --iptables=false --ip6tables=false --bridge=none --storage-driver=vfs 启动,当 BuildKit 或 runc 启动构建容器时,运行 docker build -t app . 或 docker run 仍会立即失败:
 1ERROR: failed to solve: process "/bin/sh -c ..." did not complete successfully:
 2docker: Error response from daemon: failed to create task for container: failed to create shim task: OCI runtime create failed: runc create failed: unable to start container process:
 3error during container init: error jailing process inside rootfs: pivot_root .: invalid argument
 4error during container init: error mounting "cgroup" to rootfs at "/sys/fs/cgroup": mount cgroup:/sys/fs/cgroup/cpuset (via /proc/self/fd/6), flags: 0xf, data: cpuset: operation not permitted
 5cgroups: cgroup mountpoint does not exist: unknown
 6runc create failed: systemd not running on this host: cannot use systemd cgroup manager
 7error during container init: error mounting "proc" to rootfs at "/proc": mount proc:/proc (via /proc/self/fd/6), flags: 0xe: operation not permitted
 8error during container init: error loading seccomp filter into kernel: operation not permitted
 9Temporary failure resolving 'deb.debian.org'
10Temporary failure resolving 'archive.ubuntu.com'
5. 嵌套 runsc 因 SECCOMP_FILTER_FLAG_NEW_LISTENER(EBUSY)失败
如果用户尝试在使用 systrap 平台的 runsc 内运行另一个 runsc 实例,初始化会立即中止:
1creating subprocess: sysmsg: failed to initialize thread: failed to install seccomp notify rules: device or resource busy
Linux 内核和 gVisor Sentry 都允许每个任务层级中 至多一个 SECCOMP_FILTER_FLAG_NEW_LISTENER(SECCOMP_RET_USER_NOTIF)监听器。由于外层沙箱已占用该监听器槽位,内层 seccomp(2) 调用返回 EBUSY(device or resource busy)。
gvx 如何解决 gVisor 内的嵌套执行
gvx 在其自身的用户态内核和平台层中解决了上述五个障碍,使 rungv 能够在外层 gVisor(runsc)容器内运行,甚至可以在另一个 gvx 容器内递归运行(即 gvx 嵌套于 gvx 之中)。
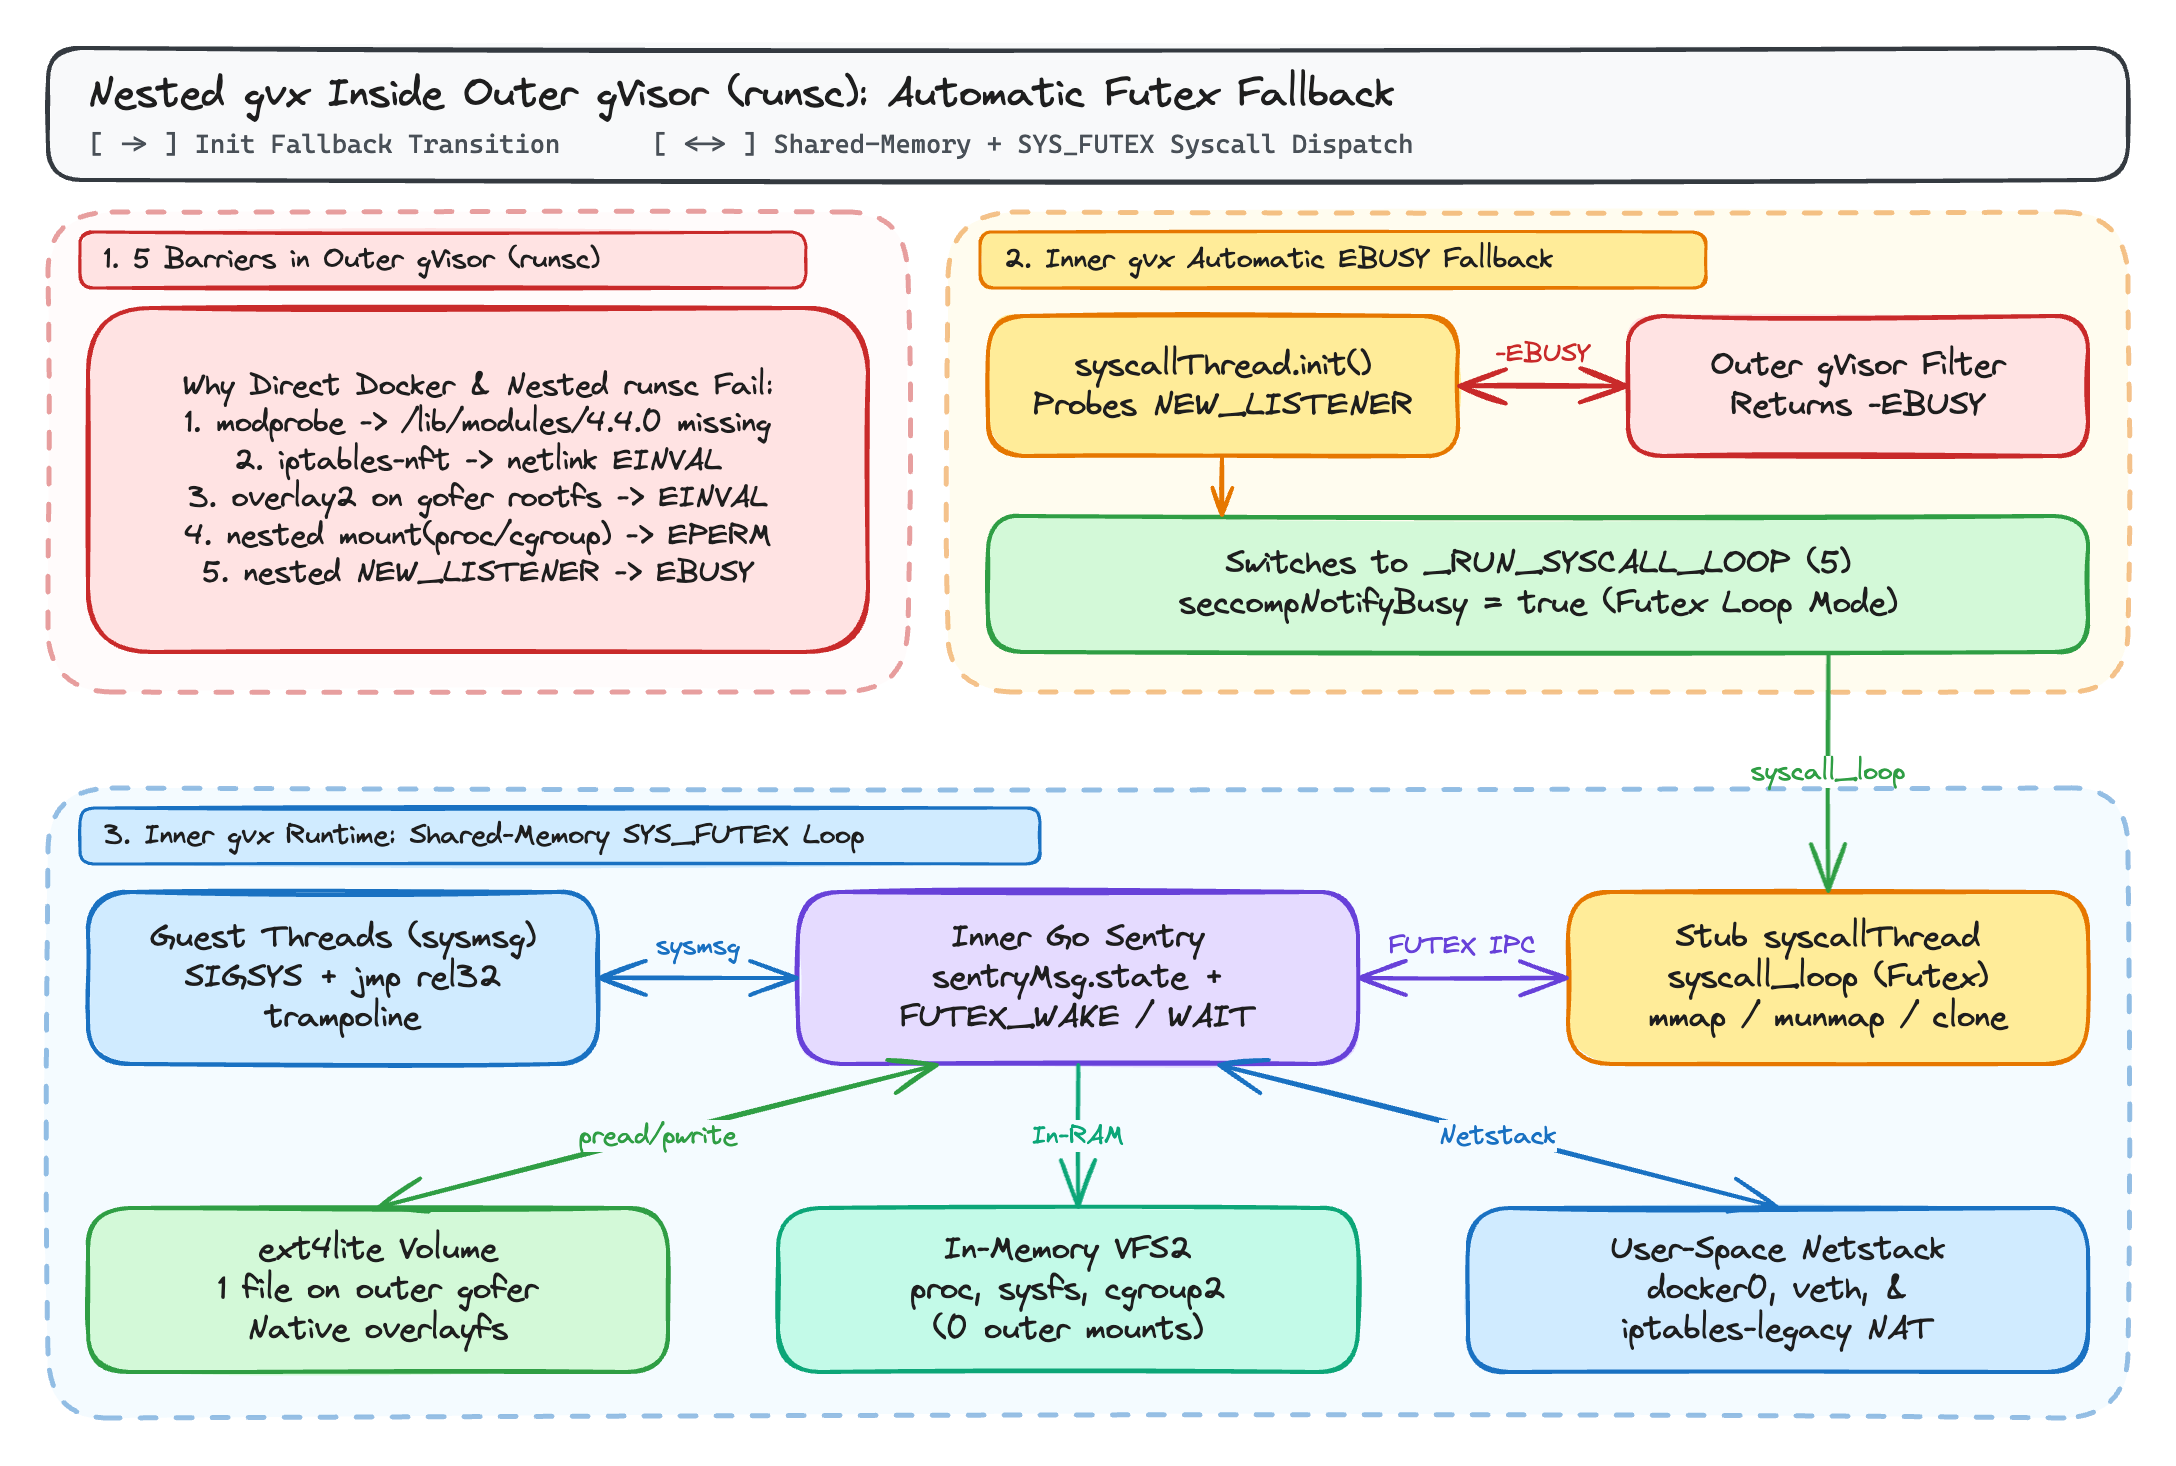
1. 从 EBUSY 自动回退到 _RUN_SYSCALL_LOOP Futex 循环
在 Linux systrap 中,每个 stub 子进程运行两类线程:
- 客户执行线程(
sysmsg):通过SECCOMP_RET_TRAP(SIGSYS)和二进制修补的jmp rel32跳板(syshandler)捕获客户系统调用,并通过共享内存和SYS_FUTEX与 Sentry 交换寄存器状态。 - stub
syscallThread(syscall_thread.go):代表 Sentry 在 stub 子进程内执行地址空间系统调用(mmap、munmap、clone)。
在上游 gVisor 中,syscallThread 在 stub_amd64.s 和 stub_arm64.s 中支持两种唤醒模式:
- Seccomp User-Notify 循环(
_RUN_SECCOMP_LOOP = 6,当t.seccompNotify != nil时):在syscallThread.init()期间,t.installSeccompNotify()安装一个SECCOMP_RET_USER_NOTIF监听器(seccomp(SECCOMP_SET_MODE_FILTER, SECCOMP_FILTER_FLAG_NEW_LISTENER, stubSyscallRules)),使 Sentry 能够通过ioctl(SECCOMP_IOCTL_NOTIF_SEND)和ioctl(SECCOMP_IOCTL_NOTIF_RECV)分派请求。 - Futex 系统调用循环(
_RUN_SYSCALL_LOOP = 5,当t.seccompNotify == nil时):syscallThread运行syscall_loop(stub_amd64.s/stub_arm64.s),在共享的 2 页syscallSentryMessage(stub 中为PROT_READ)和syscallStubMessage(stub 中为PROT_READ | PROT_WRITE)区域上,通过SYS_FUTEX(FUTEX_WAIT)进入休眠。
只要 seccompNotifyIsSupported 为真,上游 gVisor 便无条件调用 t.installSeccompNotify(),并且当 seccomp(SECCOMP_SET_MODE_FILTER, SECCOMP_FILTER_FLAG_NEW_LISTENER, ...) 返回 EBUSY 时中止 stub 创建。
在 gvx 中(pkg/sentry/platform/systrap/seccomp_notify_xplat.go 与 syscall_thread.go),syscallThread.init() 调用 t.installSeccompNotifyIfFree():
 1// 位于 pkg/sentry/platform/systrap/seccomp_notify_xplat.go
 2var seccompNotifyBusy atomic.Bool
 3
 4func (t *syscallThread) installSeccompNotifyIfFree() (*os.File, error) {
 5	if seccompNotifyBusy.Load() {
 6		return nil, nil
 7	}
 8	f, err := t.installSeccompNotify()
 9	if errors.Is(err, unix.EBUSY) {
10		if seccompNotifyBusy.CompareAndSwap(false, true) {
11			log.Warningf("Another seccomp listener exists in the filter chain of the host process. " +
12				"The stub threads use the slower futex loop instead of seccomp-unotify.")
13		}
14		return nil, nil
15	}
16	return f, err
17}
当 installSeccompNotify() 因外层 gVisor(runsc)或外层 gvx 沙箱已经占用进程过滤器链中的唯一监听器槽位而返回 unix.EBUSY 时:
installSeccompNotifyIfFree()设置seccompNotifyBusy(atomic.Bool),为该进程记录一条警告,并对该 stub 及之后所有 stub 保持t.seccompNotify == nil。- 在
syscallThread.detach()(syscall_thread_amd64.go和syscall_thread_arm64.go)中,当t.seccompNotify == nil时,在amd64上设置regs.Rbx = _RUN_SYSCALL_LOOP(5),或在arm64上设置regs.Regs[9] = _RUN_SYSCALL_LOOP,而非_RUN_SECCOMP_LOOP(6)。 - 在
syscallThread.syscall()(syscall_thread.go)中,内层 Sentry 仅通过共享内存和SYS_FUTEX分派 stub 系统调用:
1// pkg/sentry/platform/systrap/syscall_thread.go
2// 通知 syscall 线程有新的系统调用请求。
3atomic.AddUint32(&sentryMsg.state, 1)
4futexWakeUint32(&sentryMsg.state)
5
6// 等待回复。
7futexWaitWake(&sentryMsg.state, atomic.LoadUint32(&sentryMsg.state))
由于 SECCOMP_RET_TRAP 过滤器可以在客户线程栈上任意深度生效,且 syscallThread 在不请求第二个用户通知监听器的情况下回退到 _RUN_SYSCALL_LOOP,gvx 能够在 runsc 内顺利运行,并支持递归嵌套(gvx 嵌套于 gvx 之中)。
2. 基于单文件 ext4lite 卷的原生 overlayfs
为避免在外层 gVisor 容器的 gofer(9p/lisafs)根文件系统之上挂载 overlayfs,-v gvx-docker:/var/lib/docker 将 /var/lib/docker 由 gvx 内部的 ext4lite 文件系统支撑,该文件系统存储于单个常规文件(gvx-docker.ext4)中。
对外层 runsc 而言,gvx-docker.ext4 只是一个通过 pread64(2) 和 pwrite64(2) 访问的普通文件。在 gvx 内部,ext4lite 提供了一个带 JBD2 日志的 ext4 文件系统,支持 trusted.overlay.* 和 security.capability 扩展属性、字符设备 whiteout 节点(0:0)、d_type 目录项以及 RENAME_EXCHANGE,从而使内层 dockerd 能够使用其原生 overlayfs 存储驱动。
3. 具有 docker0 和 iptables-legacy 的自包含 netstack
在 gvx 内部,dockerd 不会与外层 runsc 容器的网络接口或 netfilter 表交互。相反:
dockerd在gvx自身的用户态netstack内创建其docker0网桥和veth对。- 所有
iptables-legacy规则(-t nat -N DOCKER、MASQUERADE、conntrack、addrtype)均在gvx的内部 netfilter 实现上执行。 - 嵌套的
runc容器在gvx的内存VFS2挂载表中挂载其/proc、/sys和/sys/fs/cgroup层级,从不调用外层runsc的mount(2)系统调用。
在 gVisor(或 gvx 嵌套于 gvx)内验证嵌套 docker:dind
你可以使用以下命令验证两种场景(rungv 运行于 runsc 内,或 rungv 运行于 rungv 内):
 1# 在外层 gVisor(runsc)容器或外层 rungv 容器内:
 2mkdir -p ~/.gvx
 3rungv run \
 4  -p unix:~/.gvx/docker.sock:2375 \
 5  -v gvx-docker:/var/lib/docker \
 6  -e DOCKER_TLS_CERTDIR= \
 7  docker:dind --tls=false &
 8DIND_PID=$!
 9
10export DOCKER_HOST="unix://$HOME/.gvx/docker.sock"
11until docker info >/dev/null 2>&1; do sleep 0.5; done
12
13# 验证内层 Docker 守护进程使用的是原生 overlayfs(而非 vfs)
14docker info --format 'Storage Driver: {{.Driver}}'
15# 输出:Storage Driver: overlayfs
16
17# 运行多层构建并执行嵌套容器
18mkdir -p /tmp/nested-test && cd /tmp/nested-test
19cat <<'EOF' > Dockerfile
20FROM alpine:3.20
21RUN adduser -D -u 1001 appuser && mkdir -p /app && chown appuser:appuser /app
22USER appuser
23WORKDIR /app
24RUN echo "nested-build-ok" > status.txt
25CMD ["cat", "/app/status.txt"]
26EOF
27
28docker build -t nested-test:latest .
29docker run --rm nested-test:latest
30# 输出:nested-build-ok
31
32kill -INT $DIND_PID
本系列延伸阅读
- gvx:在一个无特权进程中运行 Linux 容器、Docker 和 Kubernetes:
gvx在 Windows(whpx、systrap)、macOS(hvf)和 Linux(systrap)上的概览。 - 无需 root 或用户命名空间运行 Docker、docker build 和 docker compose:当
root、sudo、unshare(CLONE_NEWUSER)、mount(2)和/dev/fuse均被阻止时,gvx如何运行docker:dind。 - 在 gVisor 与嵌套沙箱中借助 gvx 运行 Docker-in-Docker(本文)
- 面向 AI 智能体强化学习 rollout 的快速隔离 Docker 环境(基于 gvx):如何使用
gvx和单文件ext4lite写时复制快照,以 100 毫秒的重置时间运行数百个并行的SWE-bench和 RL rollout 环境。